How To Replace Strut Mount - A Simple Guide
Hear a funny thumping sound when your car goes over bumps? That annoying noise often points to an issue with your car's strut mounts.
These mounts are pretty important parts of your vehicle's suspension system, helping keep things smooth and stable. When they start to wear out or break, you really feel it, you know? It's not just a little sound; it can be quite noticeable, actually, and it might make your ride feel a bit rougher than it should.
Fixing them yourself might seem a bit much, but with the right guidance and some basic tools, it's something many car owners can handle. This guide is here to help you figure out what's going on and show you how to get those strut mounts changed, so you can get back to a quieter ride, which is usually a very good thing.
- Glinda Lego Minifigure
- Melinda Delgado
- Madison Resort Ocean Tower
- Anyalacey Onlyfans
- Crazy I Was Crazy Once Meme
Table of Contents
- What Makes Your Car Go "Clunk"?
- How to replace strut mount - spotting the signs
- What Tools Do You Need to Replace Strut Mounts?
- Getting Ready - How to replace strut mount tools
- Can You Really Replace Strut Mounts Yourself?
- How to replace strut mount - step by step
- What Happens If You Don't Replace a Broken Strut Mount?
- Thinking About How to Replace Strut Mount - Professional Help or DIY?
- How Much Does it Cost to Replace Strut Mounts?
- How to replace strut mount - complete assemblies
What Makes Your Car Go "Clunk"?
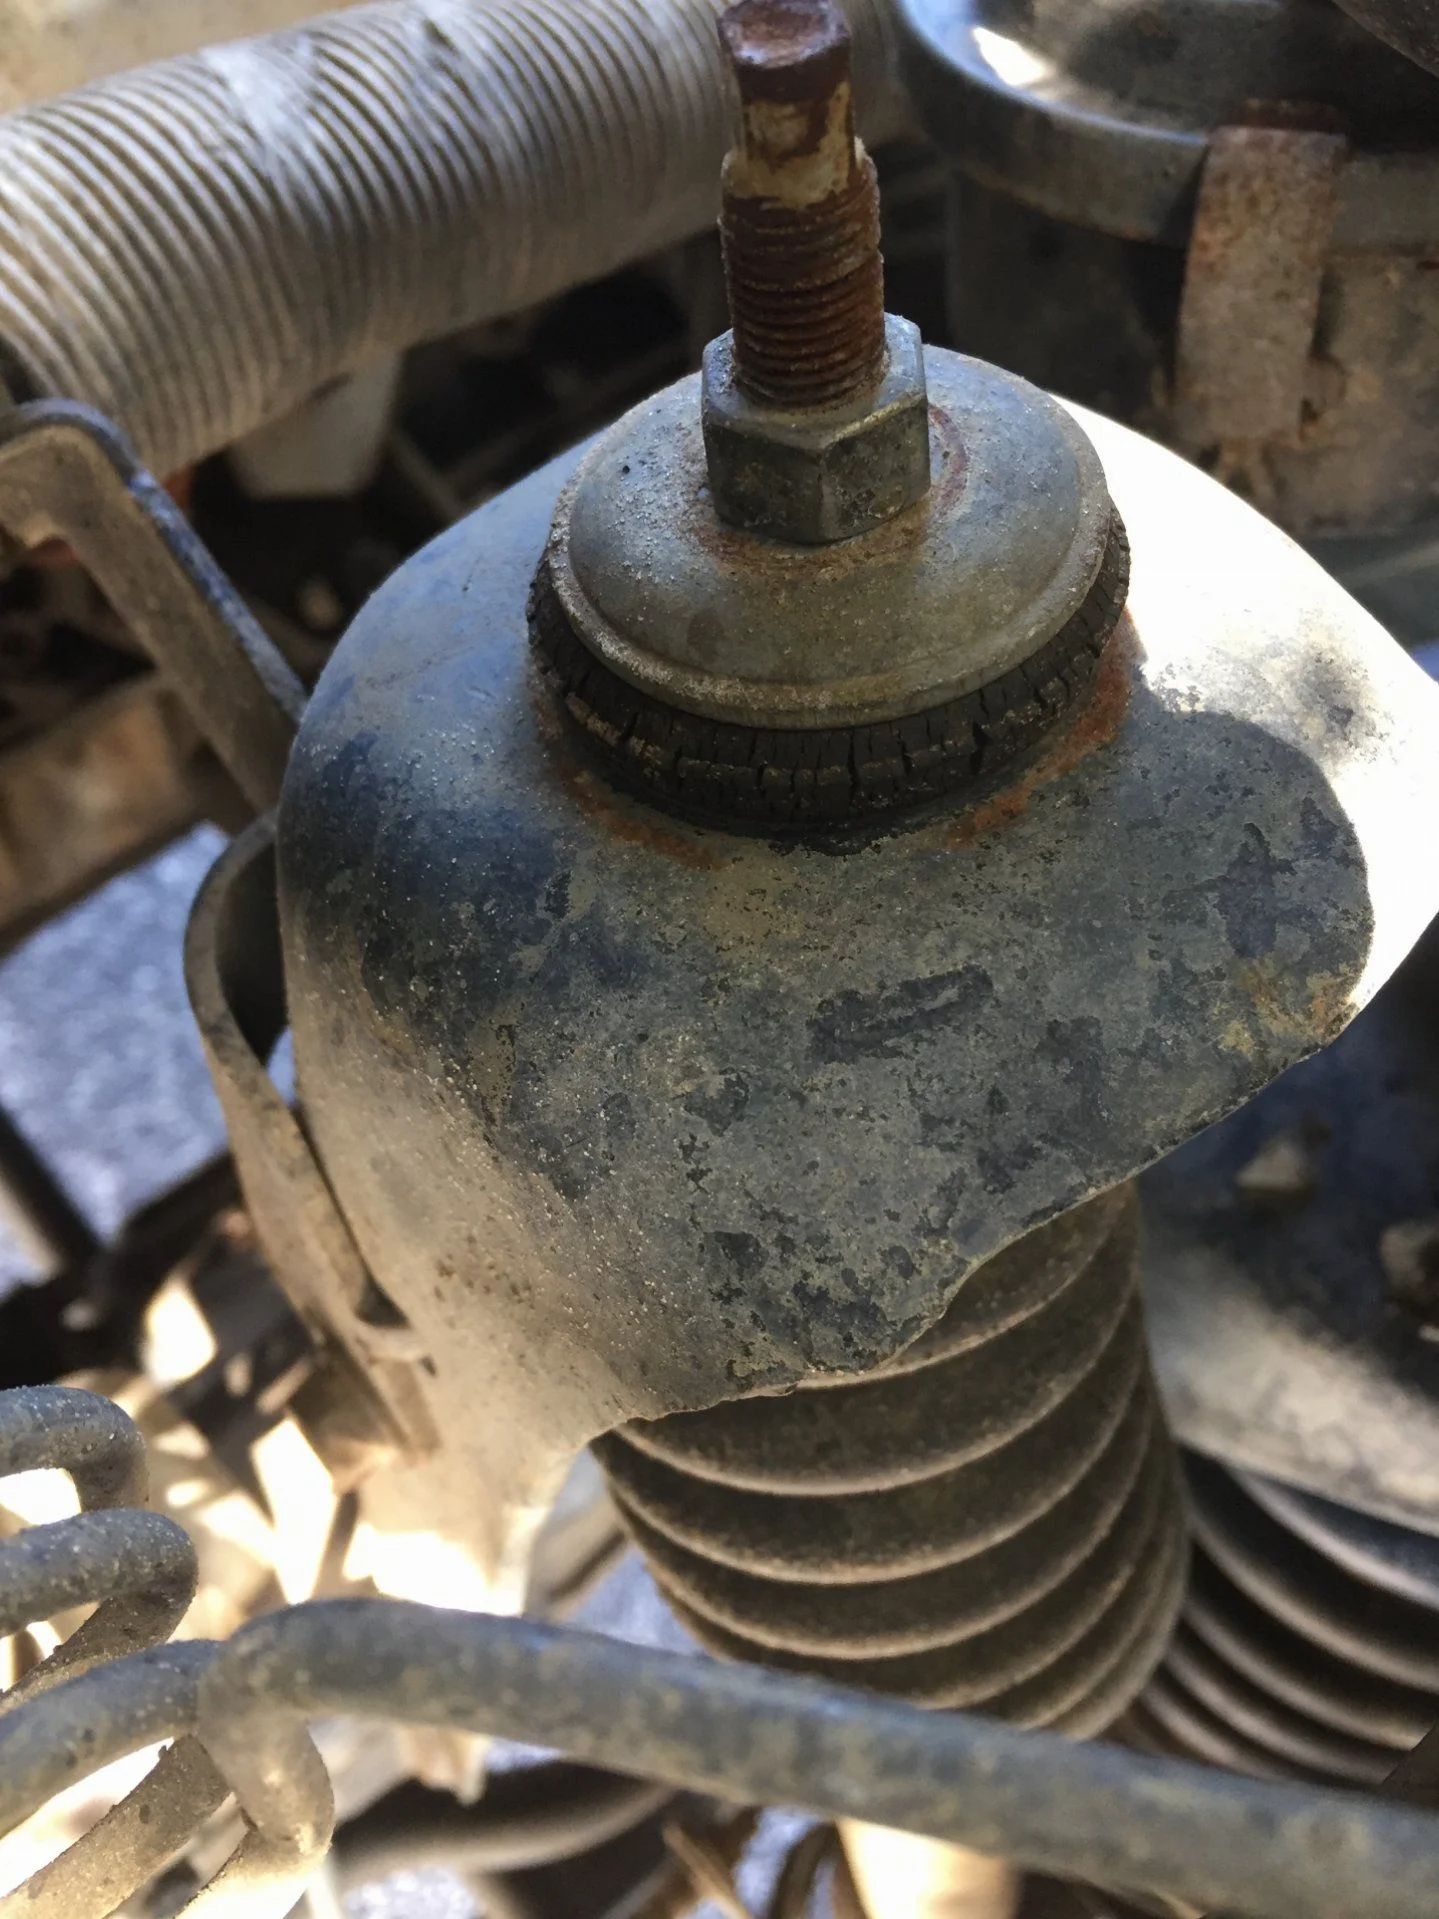
That unwelcome clunking or thudding noise you hear when your car goes over a bump or a rough patch of road is often a clear sign that something is not quite right with your vehicle's suspension. More often than not, this particular sound points to a part called the strut mount. The strut mount is a pretty important component that sits at the very top of your car's strut assembly. It basically acts as the connection point between the strut, which is a major part of your suspension, and the main body of your car. It helps to keep the strut held firmly in place while also allowing for some movement and rotation as your wheels turn and as the suspension works to absorb road impacts. So, when this part begins to wear out or breaks, it can no longer hold things as tightly as it should, you know, leading to those annoying noises.
Think of it this way: your strut is constantly moving up and down, taking a lot of force from the road. The strut mount is there to cushion that movement and keep everything aligned. When it's in good working order, it helps provide a smooth and controlled ride. But, if it gets damaged, perhaps from hitting a large pothole or just from many years of use, it can develop play. This play means that when your car hits a bump, the strut might move around a bit more than it should, causing it to knock against other parts, which is what creates that distinct clunking or thudding sound. It’s a sound that can be a little concerning, actually, especially if you're not used to hearing it.
How to replace strut mount - spotting the signs
Hearing a noise when you go over bumps is a very common sign that your strut mounts might be in need of attention, but it’s not the only way your car tries to tell you there's a problem. You might also notice a general looseness in your car's steering, almost like it's not as precise as it once was. This can make driving feel a bit less controlled, especially when you're making turns or going at higher speeds. Sometimes, you might even feel a vibration coming through the steering wheel or the floorboards of the car, which is another way your vehicle might be communicating an issue with these parts. So, keeping an eye out for these feelings is a good idea.
- Yasuri Yamileth
- Carolyn Bessette Kennedy Wedding Pictures
- The Cove At Bear X
- What Should Be Room Temperature For Newborn
- Anthropologie Walt Whitman
Beyond sounds and feelings, there are also visual clues that can help you figure out if your strut mounts are failing. If you look closely at the area where the strut connects to the car's body, you might see some visible cracks in the rubber or metal parts of the mount. Rust can also be a problem, especially in areas where roads are treated with salt in the winter, which can weaken the mount over time. In some cases, you might even notice that one corner of your car seems to sit a little lower than the others, indicating that the strut mount has collapsed or is no longer providing the proper support. Checking your tires for uneven wear patterns, like one side wearing down more quickly than the other, can also be a hint, as this can be a consequence of a suspension part not doing its job correctly. These are all things to observe, you know, if you suspect an issue.
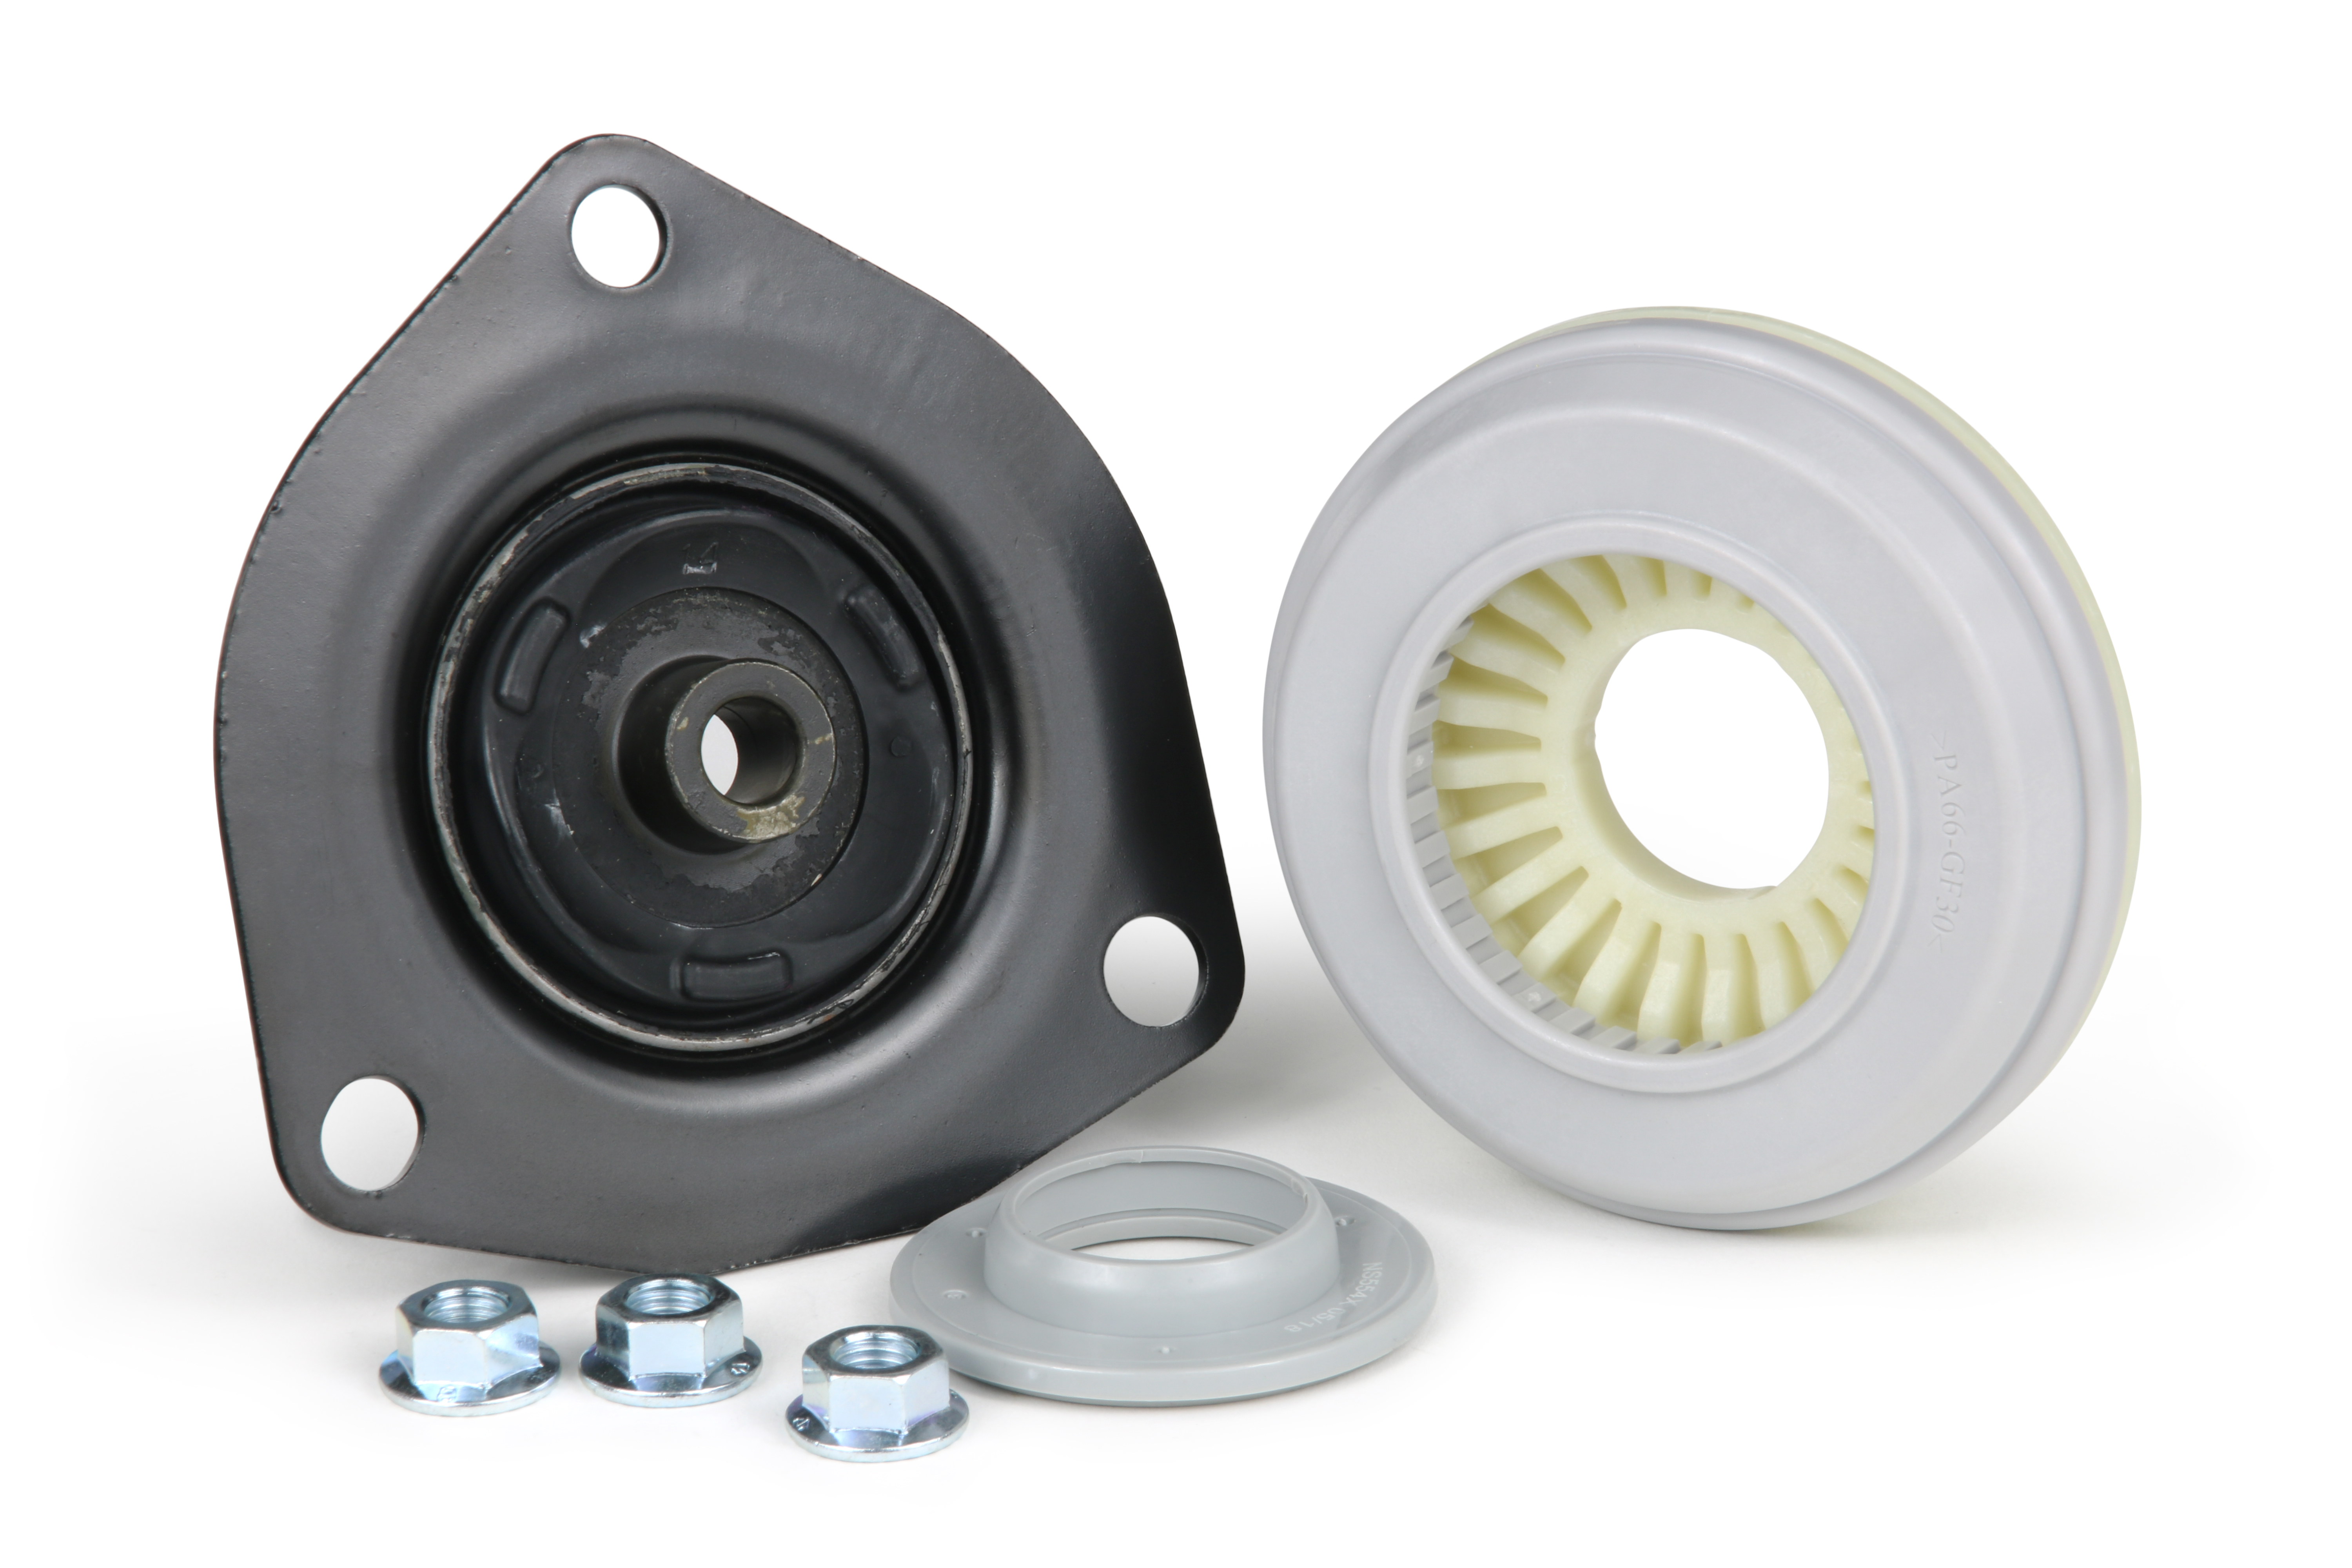
What Tools Do You Need to Replace Strut Mounts?
If you're thinking about tackling this job yourself, having the right tools on hand is pretty important. You'll want to gather a few specific items before you get started to make sure the process goes as smoothly as possible and, more importantly, safely. The tools you need are generally available at most auto parts stores or hardware shops. Getting everything ready beforehand means you won't have to stop halfway through the job to go searching for something, which is always a good thing, really.
First off, you will need a good wrench set and a socket set. These are your basic tools for loosening and tightening the various nuts and bolts that hold the strut assembly in place. Different parts of the strut might have different size fasteners, so having a range of sizes in both your wrench and socket sets is usually a good idea. You'll also need a torque wrench. This tool is pretty crucial because it lets you tighten bolts to a very specific tightness, which is important for safety and for making sure parts don't come loose or get overtightened. It's about getting things just right, you know?
Next on your list should be a strut spring compressor. This tool is very, very important for safety. Struts have a very strong spring around them that is under a lot of pressure. If you try to take the strut apart without safely compressing this spring, it could spring out with great force and cause serious injury. A spring compressor holds that spring tightly so you can work on the strut without danger. You'll also need a floor jack to lift your car off the ground and jack stands to keep it safely supported while you work. Never, ever rely solely on a jack to hold your car up; jack stands are there for your safety. And, of course, you'll need the new strut mounts that are a proper match for your specific vehicle. Getting the correct parts is pretty fundamental to the whole process, obviously.
Getting Ready - How to replace strut mount tools
Before you even think about lifting your car, make sure you have all the tools laid out and ready to go. This includes checking that your strut spring compressor is in good working order and that you understand how to use it safely. Safety really is the most important thing when you're working on a vehicle's suspension, especially with parts that are under a lot of pressure. It's a good idea to read the instructions for your spring compressor very carefully, as they can vary a little bit from one model to another. Also, confirm that your jack stands are rated for the weight of your car and that they are placed on a very solid, flat surface.
When it comes to getting your new strut mounts, make sure they are indeed the correct ones for your car's make, model, and year. There are many different types of vehicles out there, and what works for one might not work for another. You can usually find this information in your car's service manual or by checking with an auto parts store using your vehicle's details. Sometimes, people consider replacing other suspension components at the same time, like the struts themselves or the springs, especially if they are also showing signs of wear. This can save you from having to do similar work again very soon. So, planning ahead a little bit can be quite helpful, actually.
Can You Really Replace Strut Mounts Yourself?
For many car owners with some mechanical ability and the right tools, changing a strut mount is a job that can be done at home. It does require some patience and attention to detail, but it's not something that's totally out of reach for a do-it-yourself person. The steps involved are pretty straightforward, though some can be a bit challenging, especially if you've never done this kind of work before. The biggest challenge often comes with handling the very strong spring that is part of the strut assembly, which is why that special spring compressor tool is so important for your safety. It's a job that needs respect for the forces involved, you know.
However, there's a pretty neat option available these days that makes the whole process much simpler for a lot of people. You can now buy what's called a "complete strut assembly." These are full units that come with the strut, the spring, and the strut mount all put together and ready to install. This means you don't have to deal with compressing the spring yourself, which removes the most difficult and potentially dangerous part of the job. For many, this makes replacing a strut mount much more approachable, as you are essentially just unbolting the old assembly and bolting in the new one. It's a bit like swapping out a whole Lego creation instead of just one small brick, in a way.
How to replace strut mount - step by step
Let's go over the general steps involved in changing a strut mount. Remember, specific details can vary a little bit depending on your car's design, so always refer to your vehicle's service manual if you have one. First, you'll want to get your car safely lifted off the ground. Use your floor jack to raise the front or rear of the car, depending on which strut mount you are working on. Once it's up, place your jack stands securely under the car's frame, making sure they are very stable before you let the jack down. This is absolutely critical for your safety, obviously. Then, you can take off the wheel that is covering the strut you need to work on.
With the wheel removed, you'll see the strut assembly. Your next move is to loosen and remove the bolts that hold the bottom of the strut to the steering knuckle or suspension arm. These bolts can sometimes be quite tight, so a breaker bar might be helpful if you have one. Once the bottom is free, you'll move to the top of the strut, where the strut mount is located, usually under the hood or in the trunk area. Here, you'll find a few nuts that hold the top of the strut mount to the car's body. You'll loosen and remove these nuts, being careful to support the strut as it comes free. This part can be a little tricky to manage on your own, so having someone help you hold the strut as you unbolt it is quite useful.
After you have the entire strut assembly out of the car, if you are not using a complete strut assembly, this is where you will use your spring compressor. Carefully attach the compressor tools to the spring, following the instructions that came with your specific compressor. You'll then tighten the compressor to squeeze the spring together, taking the pressure off the strut mount. Once the spring is compressed, you can safely remove the large nut at the very top of the strut shaft, which will allow you to take off the old strut mount and any other washers or bushings that are there. Then, you'll put your new strut mount in place, making sure it's oriented correctly, and put back any other parts you removed. Tighten the top nut to the proper specification, which you'll find in your car's manual, using your torque wrench. After that, you can carefully release the spring compressor, making sure the spring seats properly in its new home. This is a very important step, you know, to do with care.
With the new strut mount installed and the spring safely decompressed, you're ready to put the strut assembly back into your car. Carefully guide the top of the strut mount into its opening in the car's body and loosely put the nuts back on. Then, line up the bottom of the strut with the steering knuckle or suspension arm and reinsert the bolts. Once everything is lined up, tighten all the bolts and nuts to their correct torque specifications using your torque wrench. This is where that torque wrench really comes in handy, actually, making sure everything is secured just right. Finally, put the wheel back on, tighten the lug nuts, and carefully lower your car back to the ground. If you're replacing both strut mounts, you'll repeat this whole process for the other side of the car. It's a job that takes some time, but it's very doable.
What Happens If You Don't Replace a Broken Strut Mount?
Ignoring those clunking sounds and other signs of a failing strut mount is not a good idea. If you let a broken strut mount go unrepaired, the problems will likely get worse over time. The noise will probably become more frequent and louder, which is just annoying, but more importantly, it can affect how your car handles. You might notice that your car feels less stable, especially when going around corners or over rough roads. The steering could feel loose or imprecise, making it harder to keep your car going straight, which is obviously a safety concern. It's a bit like trying to steer a boat with a wobbly rudder, you know, not very reassuring.
Beyond the immediate handling and comfort issues, a failing strut mount can also lead to other, more serious problems for your vehicle. The constant knocking and movement can put extra stress on other suspension components, like the strut itself, the control arms, or even the steering parts. This extra stress can cause these other parts to wear out much faster than they normally would, leading to more expensive repairs down the road. You might also see uneven wear on your tires, which means you'll have to replace them sooner than expected, adding to your costs. In some cases, a severely damaged strut mount could even affect your car's alignment, making it pull to one side. So, fixing it sooner rather than later is usually the best approach, to be honest.
Thinking About How to Replace Strut Mount - Professional Help or DIY?
Deciding whether to replace a strut mount yourself or take your car to a professional shop depends on a few things: your comfort level with car repairs, the tools you have, and how much time you have available. If you have some experience working on cars, feel confident using the necessary tools, and have the time to dedicate to the job, doing it yourself can save you a good bit of money on labor costs. It can also be pretty satisfying to fix something on your own car, actually. However, if you're not comfortable with mechanical work, don't have the specialized tools like a spring compressor, or simply don't have the time, then having a professional do the work is definitely the safer and more practical choice. They have the experience and all the right equipment to get the job done efficiently and correctly.
It's also worth noting that while a single failed strut mount can be replaced on its own, it is pretty common practice in the auto repair world to replace struts in pairs. This means if one front strut is bad, mechanics often suggest replacing both front struts at the same time. This is because struts tend to wear out at similar rates, and replacing them in pairs helps maintain balanced suspension performance across the axle. However, for just a strut mount, you can often replace only the one that is broken. If you are doing the job yourself, consider the condition of the other side. If one mount
- When Is The Beefy Crunch Burrito Back
- Durochers Monroe
- Ebony And Asian
- Carolyn Bessette Kennedy Wedding Pictures
- Lee Horsley Django

Strut mount | MiniTorque.com
Strut And Strut Mount - Auto World
Strut mount | IH8MUD Forum
