Cute Air Dry Clay Ghosts - Your Halloween Craft Guide
Halloween, a time for playful frights and creative fun, offers a wonderful chance to make things with your hands. You might be looking for fresh ideas to brighten up your home this spooky season. Well, imagine making something truly special, something that brings a gentle, friendly spirit to your autumn displays. These little clay figures are just the thing.
So, we are talking about creating charming, rather cute air dry clay ghosts. These aren't the scary kind, but instead, they bring a sweet touch to any space. They are a simple project, good for anyone wanting to add a bit of handmade charm to their seasonal decorations, or perhaps give a small, thoughtful gift.
This article will show you how to craft these delightful little spirits. We will cover everything from shaping them to giving them their own distinct looks. It is a creative process that is quite enjoyable, and the results are truly special, adding a touch of magic to your celebrations.
Table of Contents
- What Makes Air Dry Clay Ghosts So Charming?
- Why Consider Air Dry Clay for Your Ghostly Creations?
- Crafting Your Own Air Dry Clay Ghosts- A Simple Guide
- How Do You Make Air Dry Clay Ghosts Into Lanterns?
- Adding Personality to Your Air Dry Clay Ghosts
- Are Air Dry Clay Ghosts Just for Halloween?
- Tips for Working with Air Dry Clay
- Bringing Your Clay Ghosts to Life
What Makes Air Dry Clay Ghosts So Charming?
These little figures, these air dry clay ghosts, have a way of capturing hearts. They are quite adorable, rather sweet, and bring a feeling of gentle whimsy to the spooky season. You know, they are just perfect for making your Halloween decor a little less scary and a lot more inviting. It's almost like they smile at you from your mantelpiece or shelf.
People often like to use them as decorations around the house. They fit right in with other autumn items. Also, they make really nice, small presents for friends or family members. A handmade item, particularly one this cute, often feels very special to receive. It shows you put thought and effort into something just for them, which is pretty cool.
Air drying clay works so well for these small decorative items and little statues. You can use it to call up some fun, ghostly shapes. Then, you can give each one its own special look. This means every ghost you make can have a distinct character, which is very pleasing. You might give one a shy look, another a playful one, or perhaps one that seems to float with quiet grace.
- Bun Appetit Donuts
- Everything In The Water
- Torch Lake Beer Co
- Nike Humara Undefeated
- Spinners Florence Ms
Why Consider Air Dry Clay for Your Ghostly Creations?
So, you might wonder, why pick air dry clay for these little ghost projects? Well, it's quite simple to use, which is a big plus. It is a really good choice for people who are just starting out with clay work. You don't need any special tools or ovens, which makes it less of a fuss, and that's often a good thing.
This kind of clay is also quite kind to your wallet. It's a craft material that doesn't cost a lot, so you can make a bunch of these without spending too much money. You can find air dry clay in many craft shops or online stores, which makes it easy to get your hands on it when you are ready to create. Honestly, it's a very accessible material for anyone wanting to get crafty.
When you use white air dry clay, it's super simple. You just make your little ghost shape, then you let it sit out to dry. There's no baking involved, which saves time and effort. If you were using a clay that needed baking, you would put your ghosts, still on their shaping forms, onto a baking sheet. Then you would bake them following the directions on the clay's packaging. After baking, you would let them cool down completely. But with air dry clay, you just let time do the work, which is pretty neat.
Crafting Your Own Air Dry Clay Ghosts- A Simple Guide
Making these charming clay figures is a rather straightforward process. You will find that it is quite a quick project, perfect for kids this Halloween season. The beauty of air dry clay is how forgiving it is, allowing for many ways to get to your finished ghost. You might already have some things at home that will help you shape them, which is a bonus.
To begin, you will need some white air dry clay. Take a piece of the clay and work it a little in your hands to make it softer. Then, you can use a rolling pin to flatten it out a bit. Think about the general shape of a ghost, sort of wider at the bottom and tapering upwards. You could use a simple cone shape as a base, or even a small ball of crumpled foil to drape the clay over. This helps give your ghost a nice, flowing form.
Once you have the general shape, you can gently smooth out any rough spots. You might use a little water on your fingers to help with this. The goal is to get a pleasant, flowing shape that suggests a ghost floating. Remember, these are meant to be cute, so don't worry about making them too perfect. A little bit of unevenness can actually add to their charm, you know?
How Do You Make Air Dry Clay Ghosts Into Lanterns?
If you want your air dry clay ghosts to glow, turning them into little lanterns is a fantastic idea. It adds a really sweet, soft light to your Halloween decorations. This step is pretty easy to do while the clay is still soft and workable. It is almost like giving your ghost a little face, but for light to shine through.
To make these ghosts into small lamps, you simply need to cut out shapes for eyes while the clay is still wet. You can use a small tool, like the end of a paint brush or a toothpick, to gently cut out two small circles or oval shapes. You could even make little crescent moon shapes for sleepy eyes. The key is to do this before the clay begins to harden, as a matter of fact.
After you have made the eye openings, you then just let the clay dry completely. It is important that it is fully dry before you try to put any light inside. Once dry, you can place a small battery-operated tea light candle underneath your ghost. The light will shine through the eye holes, making your ghost look like it is gently glowing. It's a very simple trick that makes a big difference, honestly.
Adding Personality to Your Air Dry Clay Ghosts
Giving your air dry clay ghosts their own unique character is one of the most enjoyable parts of this project. This is where your creativity can really come out. You can make each one different, so they all have their own little story. It's pretty much like giving them a soul, in a way.
You can use markers to draw on faces, add small details, or even color them. For instance, creating a cute pet ghost in a bottle with Ooly Creatibles air dry clay and markers sounds like a really fun, simple craft project for kids. It's a rather spooktacular Halloween activity that allows for lots of personal touches. You can make them look silly, happy, or even a little bit shy, you know?
I really like how lighter, softer Halloween decorations are becoming popular. These flower-decorated clay ghosts, made with air dry clay and adorned with dried flowers, are a perfect example. They offer a lovely way to make your Halloween decor feel more delicate and pretty. You can glue small dried petals or tiny leaves onto your ghosts to give them a natural, ethereal look. This makes them feel very unique, almost like they came from a magical garden.
If you want to try something a little different, polymer clay is also available in many colors. It even comes in a see-through finish, which I think would look fantastic with these ghost figures. Imagine a slightly clear ghost with a tiny light inside; it would be very magical. This offers another way to make your ghosts truly special, should you want to explore different materials.
Are Air Dry Clay Ghosts Just for Halloween?
While these little air dry clay ghosts are certainly a wonderful fit for Halloween, their charm isn't limited to just one season. You might find that their sweet, gentle look makes them suitable for other times of the year too. They have a certain appeal that goes beyond the spooky holiday, which is pretty cool.
Consider placing them on a shelf in a child's room. They could be a friendly little presence year-round, a quiet companion. Or perhaps they could be part of a whimsical display on a bookshelf, adding a touch of handmade artistry. Their simple form and soft look mean they can blend into many decor styles, not just the festive ones. They are quite versatile, in fact.
They also make thoughtful gifts for any occasion. A handmade ghost, perhaps with a little flower or a unique painted detail, could be a sweet token for someone who enjoys unique, crafted items. It shows a personal touch that store-bought items often lack. So, while they shine brightest at Halloween, their potential reaches much further, as a matter of fact.
Tips for Working with Air Dry Clay
Working with air dry clay is usually a straightforward process, but a few simple tips can make your crafting experience even better. These suggestions will help you get the best results for your air dry clay ghosts and other creations. It's all about making the process enjoyable and getting a good finished piece, you know?
First, when you open your clay, only take out the amount you plan to use right away. Air dry clay, as its name suggests, hardens when exposed to air. So, keep the rest of your clay sealed up tightly in its package or in an airtight container. This stops it from drying out before you get to use it all, which is pretty important.
When you are shaping your ghosts, try to work on a smooth surface. A little bit of water on your fingertips can help smooth out any rough spots or cracks as you go. Just use a tiny bit, as too much water can make the clay sticky. If you are using a mold, like a crumpled paper cone, leave the ghosts on the mold to dry. This helps them keep their shape as they harden. This is quite helpful, honestly.
Once your clay ghosts are fully dry, which can take a day or two depending on their size and how humid your environment is, you can add a protective finish. A gloss or Mod Podge can give them a nice shine and help them last longer. It also protects any decorations you've added. This step is not strictly necessary for every project, but it does make them look more finished and durable, which is nice.
Bringing Your Clay Ghosts to Life
After you have shaped and dried your air dry clay ghosts, and perhaps added some unique touches, the final step is to display them. This is where they truly come to life and add that special charm to your home. It's really satisfying to see your handmade creations in their place, adding a little bit of magic, you know?
You could arrange a collection of them on a mantelpiece, perhaps alongside some autumn leaves or small pumpkins. They look very sweet when grouped together, each with its own little personality. If you made them into lanterns, placing them where their gentle glow can be seen in the evening creates a lovely, calming atmosphere. They are quite good at setting a cozy mood.
For a child's room, these ghosts can be part of a playful display. They are safe and sturdy, making them good for little hands to admire. You might even hang a few from a mobile or a decorative branch. The possibilities for displaying them are quite wide, allowing you to get creative with how you show off your work. It's basically about finding the spot where they make you smile the most.
Remember, these clay ghosts are simple, fun, and will add a lovely, gentle charm to any setting. Whether you are a beginner or someone who enjoys making things, this project offers a rewarding way to create something special. There are probably many ways to make these, using things you might already have, which is pretty convenient.
This article has shown you how to make delightful air dry clay ghosts, perfect for adding a sweet, handmade touch to your Halloween or everyday decor. We talked about why air dry clay is a good choice for this kind of project, being easy to use and budget-friendly. You learned how to shape your ghosts, how to turn them into glowing lanterns by cutting out eyes, and many ways to give each ghost its own distinct look with markers or dried flowers. We also covered general tips for working with air dry clay and ideas for displaying your finished creations, showing that these charming figures can be enjoyed well beyond the Halloween season.
Air - Energy Education
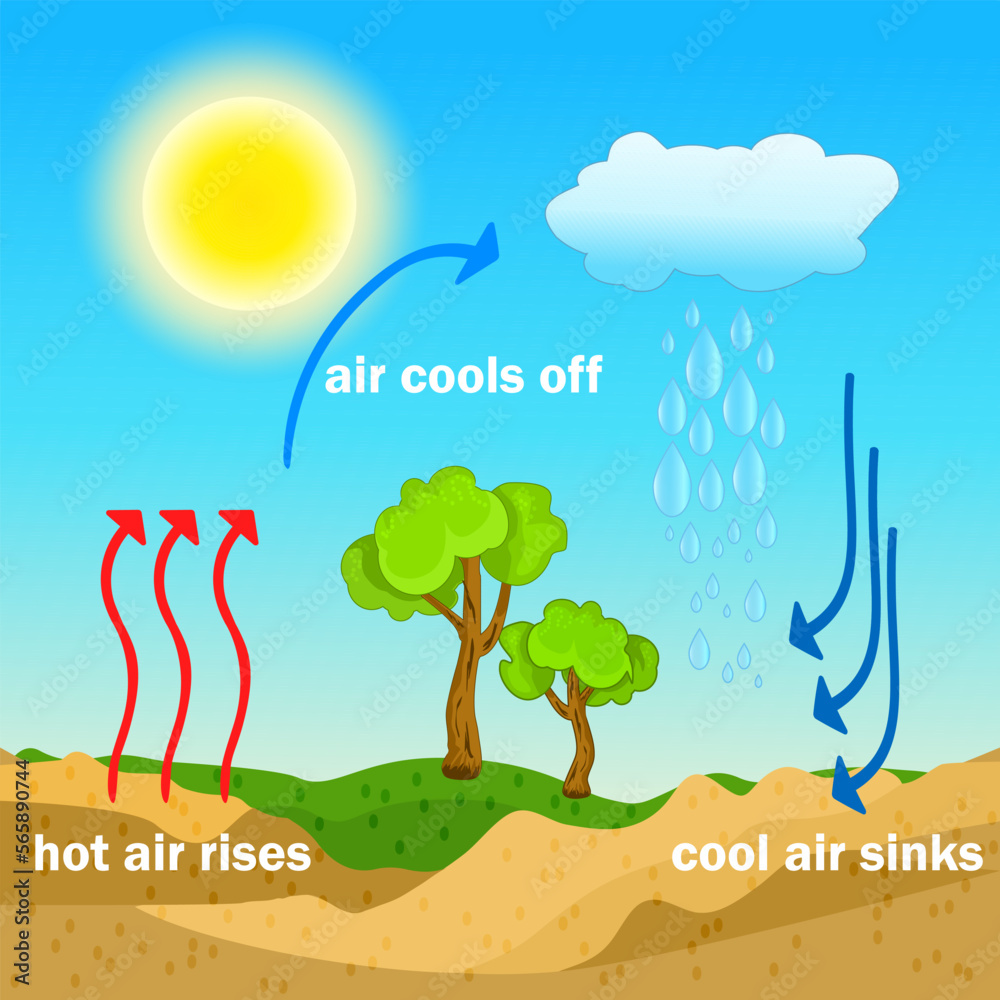
Convection process diagram. Warm air rises and cool air sinks. Hot and

Clean Air #air | Viento, Google
